04-gitlab服务部署
Gitlab介绍
GitLab是一个利用 Ruby on Rails 开发的开源应用程序,实现一个自托管的Git项目仓库,可通过Web界面进行访问公开的或者私人项目。
GitLab拥有与Github类似的功能,能够浏览源代码,管理缺陷和注释。可以管理团队对仓库的访问,它非常易于浏览提交过的版本并提供一个文件历史库。它还提供一个代码片段收集功能可以轻松实现代码复用,便于日后有需要的时候进行查找。
Gitlab 是一个基于Git实现的在线代码仓库托管软件,你可以用Gitlab自己搭建一个类似于Github一样的系统平台,一般搭建gitlab私服就是用在公司的内部
Gitlab 功能就是能够对代码的提交审核和问题跟踪,这个对于软件工程质量的管理是至关重要的
Gitlab分为社区版(CE) 和 企业版(EE) 我感觉大多数的公司还是会选择社区版,反正我们公司是要用社区版的
部署Gitlab 是对服务器有配置要求的 建议是CPU两核,内存4G以上(其实这就是废话了,谁家公司还没这样配置的服务器呀,主要还是给虚拟机玩的朋友们提示一下)
实现的原理
其实gitlab的原理就是git的原理,GitHub不是也是基于Git的呀,所有简单说一下Git的原理吧

上面的就是整个Git的工作流程:
其实上面的都是一些GIt的命令,先不管命令是做什么的,这里面有四个大块的东西,他们分别是
- Remote:远程仓库
- Repository:本地仓库
- index:暂存区
- workspace:工作区
Remote远程仓库:

远程仓库的内容可能被分布在多个地点的处于协作关系的本地仓库修改,因此它可能与本地仓库同步,也可能不同步,但是它的内容是最旧的<br>

Repository本地仓库:

这里面保存了对象被提交过的各个版本,比起工作区和暂存区的内容,它更旧一些

git commit 后同步index的目录树到本地仓库,方便下一步通过git push同步本地仓库与远程仓库的同步<br>

index暂存区:

.git目录下的index文件,暂存区会记录git add 添加文件的相关信息(文件名、大小),不保存文件实体,通过id指向每个文件的实体,可以使用git status查看暂存区的状态,暂存区标记了你当前工作区中那些内容是被git管理的

当你完成某个需求或者功能后需要提交代码,那么第一步就是通过git add 先提交到暂存区,被git管理<br>

workspace工作区:

程序员进行开发改动的地方,是你当前看到的,内容也是最新的

平常我们开发就是拷贝远程仓库中的分支,基于该分支进行开发,在开发的过程就是在工作区的操作<br>

总结:

任何对象都是在工作区中诞生和修改的

任何修改都是从进入index区才开始被版本控制的

只有把修改的代码提交到本地仓库,该修改才能在仓库中留下痕迹

与协助者分享本地的修改,可以push到远程仓库来共享
下面这张图很明确的表现了他们的关系

Gitlab服务的构成
Gitlab有好多个东西一起构成的,分别是:
- Nginx:静态Web服务器
- gitlab-shell:用于处理Git命令和修改authorized keys列表
- gitlab-workhorse:轻量级的反向代理服务器(这个是个敏捷的反向代理,它会处理一些大的HTTP请求,比如文件的上传下载,其他的请求会反向代理给Gitlab Rails应用)
- logrotate:日志文件管理工具
- postgresql:数据库
- redis:缓存数据库
- sidekiq:用于在后台执行队列的任务
- unicorn:Gitlab Rails应用是托管在这个服务器上面的
GitLab的优缺点
- git是分布式的,svn不是 git分布式本地就可以用,可以随便保存各种历史痕迹,不用担心污染服务器,连不上服务器也能提交代码、查看log。
- GIT分支和SVN的分支不同 分支在SVN中实际上是版本库中的一份copy,而git一个仓库是一个快照,所以git 切换、合并分支等操作更快速。
- git有一个强大的代码仓库管理系统 - gitlab 可以很方便的管理权限、代码review,创建、管理project
环境准备
[root@linux-node1 ~]# cat /etc/redhat-release
CentOS Linux release 7.3.1611 (Core)
[root@linux-node1 ~]# uname -r
3.10.0-514.2.2.el7.x86_64

下载epel源
[root@linux-node1 ~]# wget http://mirrors.aliyun.com/epel/epel-release-latest-7.noarch.rpm
[root@linux-node1 ~]# wget -O /etc/yum.repos.d/CentOS-Base.repo http://mirrors.aliyun.com/repo/Centos-7.repo

关闭 NetworkManager 和防火墙
[root@linux-node1 ~]#systemctl stop firewalld.service
systemctl disable firewalld
systemctl disable NetworkManager

关闭SELinux并确认处于关闭状态
sed -i 's/SELINUX=enforcing/SELINUX=disabled/' /etc/selinux/config
grep SELINUX=disabled /etc/selinux/config
setenforce 0

更新系统并重启
[root@linux-node1 ~]# yum update -y && reboot
YUM配置
我们一共有2台:192.168.56.11和192.168.56.12我们安装在192.168.56.11上
[root@linux-node1 /]# yum install curl policycoreutils openssh-server openssh-clients postfix -y
[root@linux-node1 /]# systemctl start postfix
[root@linux-node1 /]# curl -sS https://packages.gitlab.com/install/repositories/gitlab/gitlab-ce/script.rpm.sh | sudo bash
[root@linux-node1 /]# yum install -y gitlab-ce
#由于网络问题,国内用户,建议使用清华大学的镜像源进行安装
[root@linux-node1 ~]# cat /etc/yum.repos.d/gitlab-ce.repo
[gitlab-ce]
name=gitlab-ce
baseurl=http://mirrors.tuna.tsinghua.edu.cn/gitlab-ce/yum/el7
repo_gpgcheck=0
gpgcheck=0
enabled=1
gpgkey=https://packages.gitlab.com/gpg.key
[root@linux-node1 ~]# yum makecache
安装部署
开始安装gitlab(此步骤是安装最新版本)
[root@linux-node1 ~]# yum install -y gitlab-ce git
开始安装gitlab(此步骤是指定版本安装)
wget -c http://mirrors.tuna.tsinghua.edu.cn/gitlab-ce/yum/el7/gitlab-ce-14.6.0-ce.0.el7.x86_64.rpm
yum -y localinstall gitlab-ce-14.6.0-ce.0.el7.x86_64.rpm
配置启动
配置并启动gitlab-ce
[root@linux-node1 ~]# gitlab-ctl reconfigure
#时间可能比较长,耐心你等待即可!----
gitlab常用命令:
关闭gitlab:[root@linux-node2 ~]# gitlab-ctl stop
启动gitlab:[root@linux-node2 ~]# gitlab-ctl start
重启gitlab:[root@linux-node2 ~]# gitlab-ctl restart
重载配置文件: gitlab-ctl reconfigure
可以使用gitlab-ctl管理gitlab,例如查看gitlab状态:
[root@linux-node1 /]#  gitlab-ctl status
run: gitlab-workhorse: (pid 7437) 324s; run: log: (pid 7436) 324s
run: logrotate: (pid 7452) 316s; run: log: (pid 7451) 316s
run: nginx: (pid 8168) 2s; run: log: (pid 7442) 318s
run: postgresql: (pid 7293) 363s; run: log: (pid 7292) 363s
run: redis: (pid 7210) 369s; run: log: (pid 7209) 369s
run: sidekiq: (pid 7479) 265s; run: log: (pid 7426) 326s
run: unicorn: (pid 7396) 327s; run: log: (pid 7395) 327s
提示: 我们要保证80端口不被占用
我们可以查看一下端口
[root@linux-node1 /]# gitlab-ctl restart
ok: run: gitlab-workhorse: (pid 8353) 0s
ok: run: logrotate: (pid 8360) 1s
ok: run: nginx: (pid 8367) 0s
timeout: down: postgresql: 0s, normally up, want up
ok: run: redis: (pid 8437) 0s
ok: run: sidekiq: (pid 8445) 0s
ok: run: unicorn: (pid 8450) 0s

[root@linux-node1 /]# lsof -i:80
COMMAND  PID       USER   FD   TYPE DEVICE SIZE/OFF NODE NAME
nginx   8367       root    7u  IPv4  54972      0t0  TCP *:http (LISTEN)
nginx   8368 gitlab-www    7u  IPv4  54972      0t0  TCP *:http (LISTEN)
访问web
**Web:**访问:192.168.56.11

**提示:**启动gitlab需要时间!
Web页面提示我们需要设置一个账号密码(我们要设置最少8位数的一个账号密码)我们设置密码为:12345678
我们在后面的页面设置用户名

我们现在是以管理员的身份登陆

关闭注册
我们点击右上角管理区域
**第一步:**我们关闭自动注册,因为我们内部使用不需要用户自己注册,由运维分配用户即可

提示:Save在页面最下放!!!!!! 记得点保存!!!!!!!!!!!!

现在在查看首页就没有注册页面了
忘记密码
第一次使用gitlab登陆网页没有提示更改密码
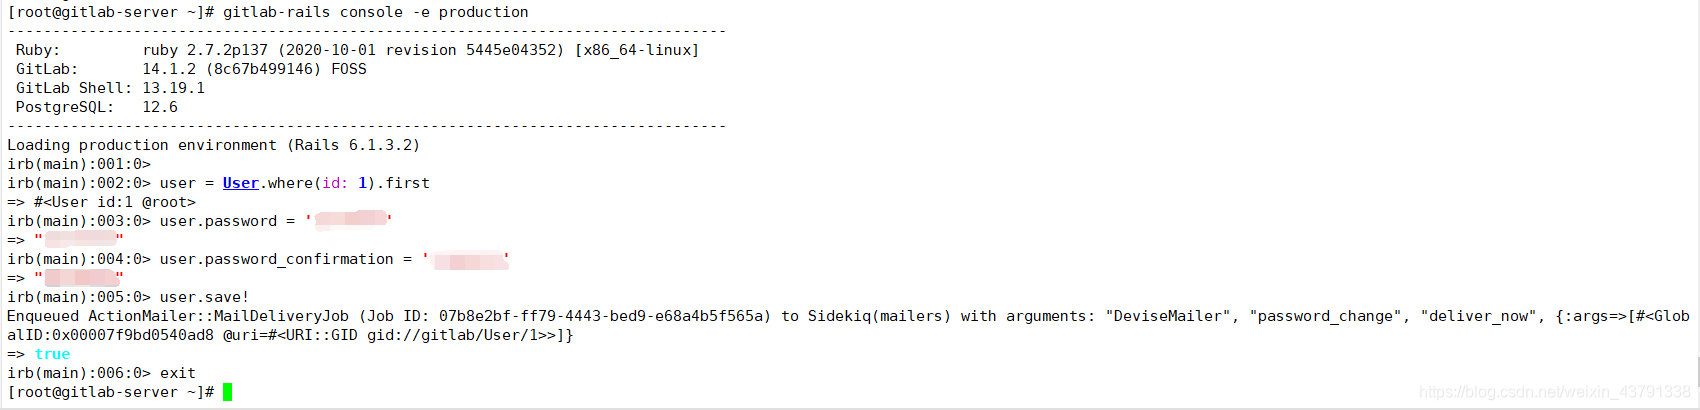
进入 GitLab 控制台
gitlab-rails console -e production
执行命令: user = User.where(id: 1).first          # 此 user 则表示 root 用户
执行命令:user.password = '12345678'               # 修改密码,
执行命令:user.password_confirmation = '12345678'  # 确认密码
执行命令: user.save!
执行命令: exit
对接openldap
Gitlab和OpenLDAP的集成 https://blog.csdn.net/wangzhimin0928/article/details/109036346
配置信息如下:
[root@linux-node19 ~]# vim /etc/gitlab/gitlab.rb
gitlab_rails['ldap_enabled'] = true
gitlab_rails['ldap_servers'] = YAML.load <<-'EOS'
  main: # 'main' is the GitLab 'provider ID' of this LDAP server
    label: 'LDAP'
    host: '192.168.56.85'
    port: 389
    uid: 'cn'
    bind_dn: 'cn=admin,dc=bkce,dc=com'
    password: '123456'
    encryption: 'plain' # "start_tls" or "simple_tls" or "plain"
    verify_certificates: true
    smartcard_auth: false
    active_directory: true
    allow_username_or_email_login: false
    lowercase_usernames: false
    block_auto_created_users: false
    base: 'dc=bkce,dc=com'
    user_filter: ''
EOS


gitlab-rake gitlab:ldap:check
修改完成后,保存并退出
重新加载GitLab配置
gitlab-ctl reconfigure
检查配置是否成功
[root@linux-node84 ~]# gitlab-rake gitlab:ldap:check
Checking LDAP ...

LDAP: ... Server: ldapmain
LDAP authentication... Success
LDAP users with access to your GitLab server (only showing the first 100 results)
    DN: cn=openstack,ou=groups,dc=bkce,dc=com    cn: openstack
    DN: cn=master,ou=users,dc=bkce,dc=com    cn: master
    DN: cn=test01,cn=master,ou=users,dc=bkce,dc=com  cn: test01
    DN: cn=test02,cn=master,ou=users,dc=bkce,dc=com  cn: test02
    DN: cn=group01,cn=master,ou=users,dc=bkce,dc=com     cn: group01
    DN: cn=test03,cn=master,ou=users,dc=bkce,dc=com  cn: test03
    DN: cn=test04,cn=master,ou=users,dc=bkce,dc=com  cn: test04

Checking LDAP ... Finished
重新访问GitLab地址使用LDAP用户登录

这里使用之前创建好的其中一个用户账号
